月度归档:2017年09月

搬瓦工如何取消服务并退款

搬瓦工的所有服务都有提供30天退款保证的,你可以任意试用它家的服务而不用担心其没有达到预期而造成浪费。

注意:每个账户最多只可退款两次,超过两次会进黑名单造成不可测的问题。

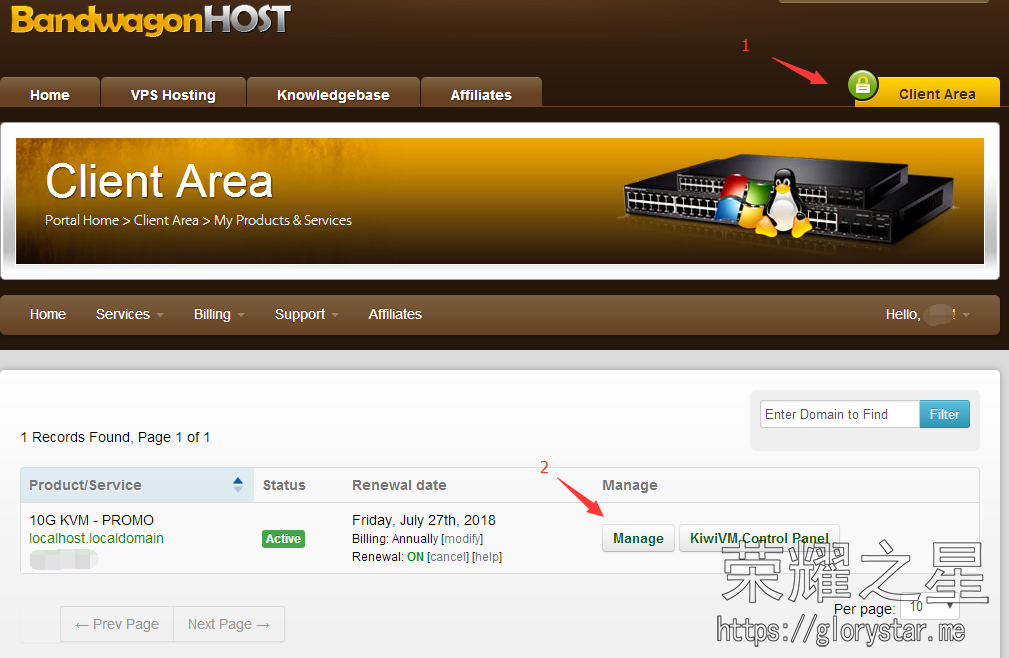
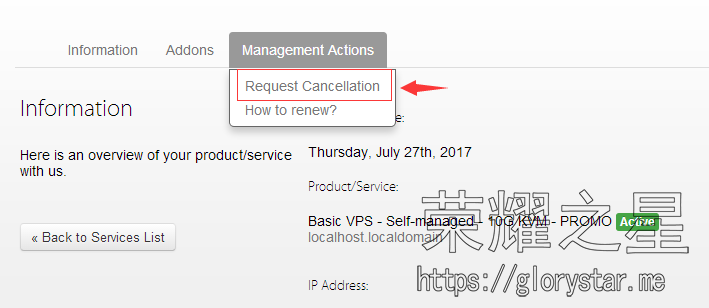
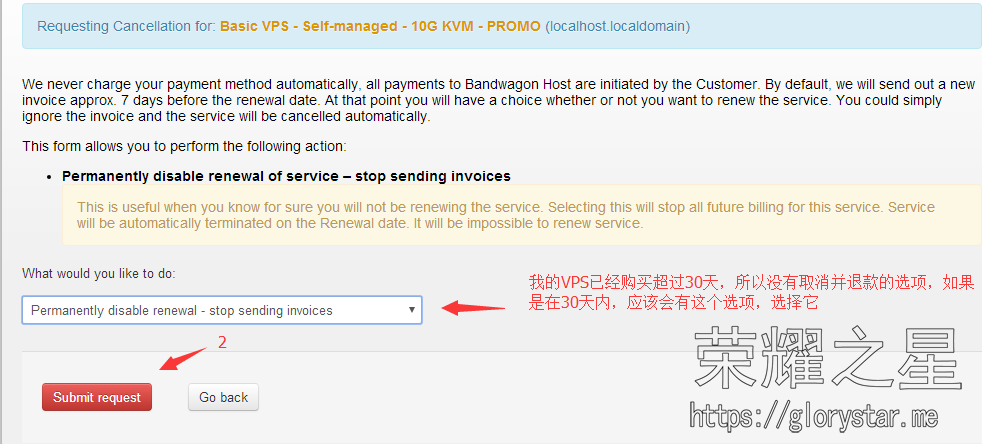
它并没有在后台直接给出取消链接,刚刚发现其已经有提供这个功能,我还停留在以前,我的锅。取消方法如下图:

bwg-refund.png
bwg-refund1.png
bwg-refund2.png

也可以通过提交工单让客服处理。

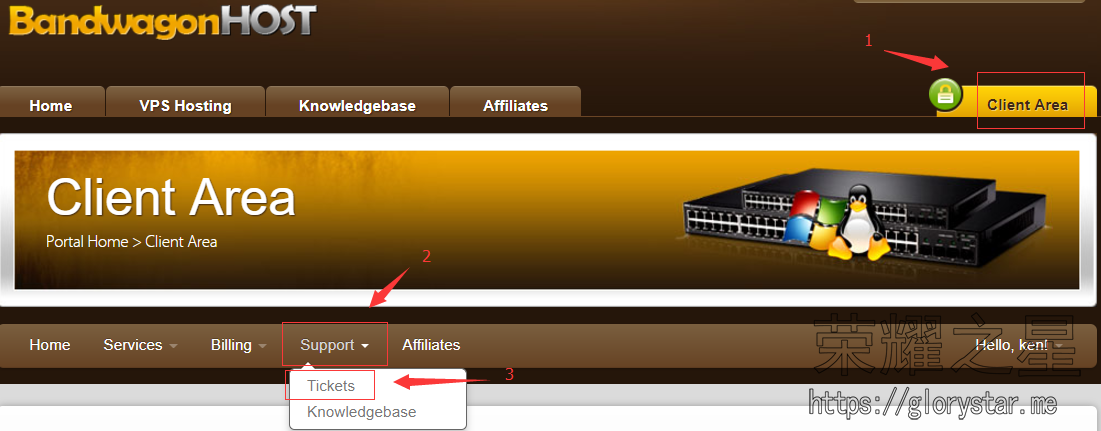
  1. 首先登陆你的搬瓦工账号 点此传送–搬瓦工官网
  2. 在用户中心的Support里找到Tickets(工单),点进去,如下图

bwg-refund.png

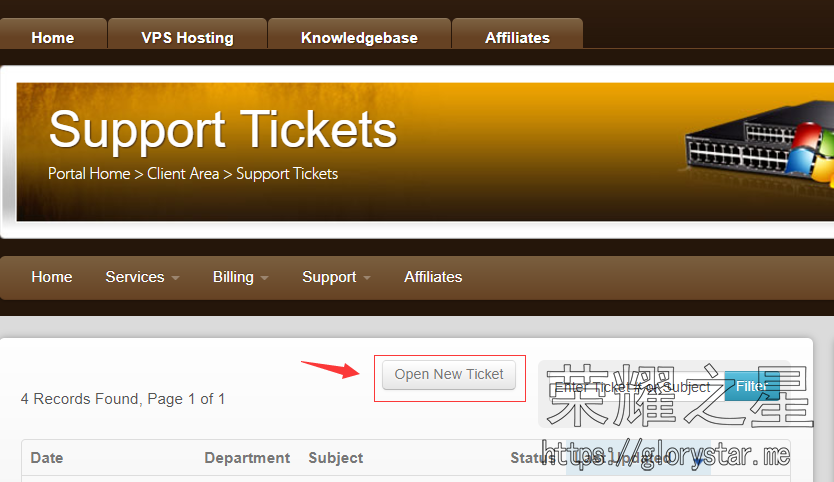
  1. 在工单里选择提交新工单,如下图

bwg-refund-2.png

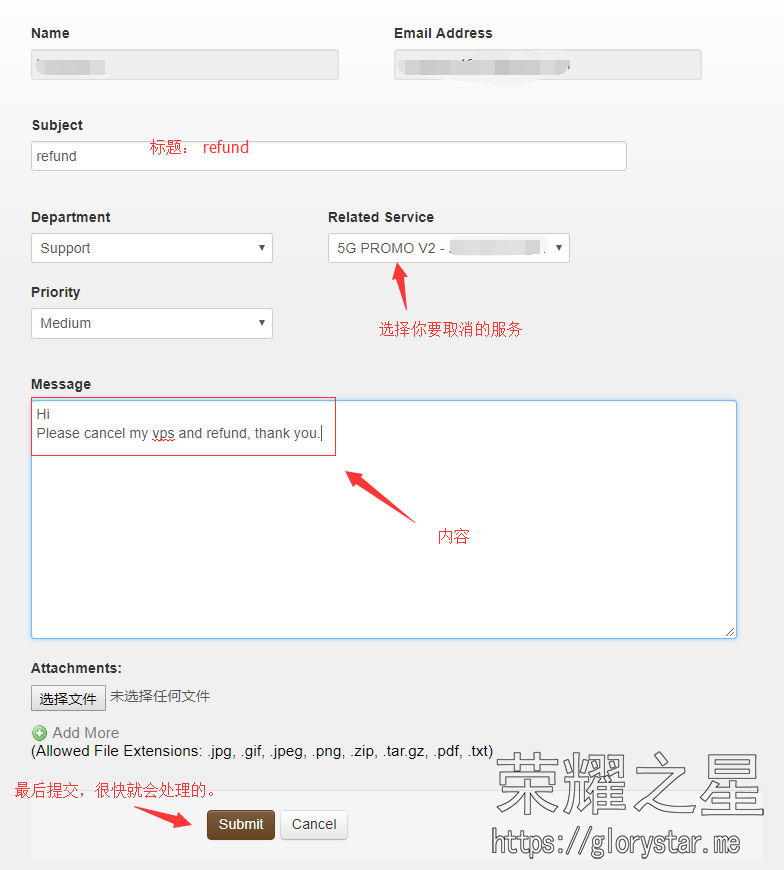
  1. 如下图的格式填写工具内容,客服很快就会处理的。标题: refund 内容: Please cancel my vps and refund, thank you.

bwg-refund-3.png

CentOS6.9编译安装新版gcc

最近评论区很多人在反映之前写的 感觉速度很慢?使用BBR优化服务器加速小飞机! 优化加速配置时出错,当时这个教程我是用我的搬瓦工一步一步配置过来的,验证成功了,最近怎么那么多人反映同样的问题呢?

问题如下
在执行编译魔改BBR模块时出错

make[1]: *** [/root/tcp_tsunami.o] Error 1
make: *** [_module_/root] Error 2

之前看到作者说编译这个需要gcc4.9以上的版本,但CentOS6 yum安装最新的版本也才4.4,以为是gcc版本的问题,就折腾编译安装gcc4.9 最后安装成功了,有些依赖要先安装好,经过几次试错并请教Google总算趟平,贴下过程

yum update -y
#安装C和C++的静态库
yum install -y glibc-static libstdc++-static
#安装旧版本的gcc、c++编译器
yum install gcc gcc-c++ -y
#安装wget
yum install wget -y
#下载gcc4.9.4源码
wget ftp://ftp.gnu.org/gnu/gcc/gcc-4.9.4/gcc-4.9.4.tar.gz
tar zxf gcc-4.9.4.tar.gz
cd gcc-4.9.4
#下载依赖的 GMP MPC MPFR
sh ./contrib/download_prerequisites
#按官方建议新建一个文件夹用于编译
mkdir ../gcc_4.9.4_build && cd ../gcc_4.9.4_build
#根据自己的需要修改config项目,建议指定目录便于多版本管理。
../gcc-4.9.4/configure --prefix=/usr/local/gcc-4.9.4/ --enable-checking=release --enable-languages=c,c++ --disable-multilib
make
make install

安装好之后新版gcc并不是默认使用的版本,如要默认使用新版gcc进行编译,还需要配置环境变量,把以下代码添加到~/.bash_profile

export PATH=/usr/local/gcc-4.9.4/bin:$PATH

可能遇到的问题

出错的时候检查编译目录下的config.log日志文件,查找error信息

 cat ./config.log|grep error

error -static-libstdc++ not implemented

 export LD_LIBRARY_PATH=$LD_LIBRARY_PATH:/usr/lib

g++: command not found G++没有装或没有更新

yum -y update gcc
yum -y install gcc+ gcc-c++

编译安装需时很长,我的搬瓦工编译了半个多小时才好,还因为占用CPU过多被强制降频了,如不想折腾编译可参考以下yum安装办法

gcc 4.8 安装

curl -Lks http://www.hop5.in/yum/el6/hop5.repo > /etc/yum.repos.d/hop5.repo
yum install gcc gcc-g++
gcc --version

gcc 4.9 安装

yum install centos-release-scl
yum install devtoolset-3-toolchain
scl enable devtoolset-3 bash
gcc --version

gcc 5.2 安装

yum install centos-release-scl
yum install devtoolset-4-toolchain
scl enable devtoolset-4 bash
gcc --version

scl enable devtoolset-3bash 只是临时覆盖系统原有的GCC引用,如果想永久覆盖,可在root/.bashrc文件中添加如下代码
source /opt/rh/devtoolset-3/enable

参考链接:
Linux下编译安装GCC 4.9.4
CENTOS 6.5 安装gcc 4.9.1
CentOS 6.x通过yum安装gcc 4.8, 4.9, 5.2等高版本GCC

折腾到最后发现并不是gcc版本的问题,是因为使用Teddysun的一键更换BBR内核脚本默认安装最新的BBR内核,这个是一直在更新的,我之前安装时最新版还是4.12,现在已经是4.13了,而魔改模块还不支持4.13。

正在修改一键包,修改后放出。

Directadmin使用Let’s encrypt 后台https登陆 并配置用户一键开启SSL

首先开启SNI,以支持多个证书绑定一个IP

echo enable_ssl_sni=1 >> /usr/local/directadmin/conf/directadmin.conf

加入开启Letsencryp自动配置项

echo letsencrypt=1 >> /usr/local/directadmin/conf/directadmin.conf

重启DA

echo "action=directadmin&value=restart" >> /usr/local/directadmin/data/task.queue; /usr/local/directadmin/dataskq d2000

添加/.well-known重定向

cd /usr/local/directadmin/custombuild
./build rewrite_confs

获取最新的脚本

cd /usr/local/directadmin/custombuild
./build update
./build letsencrypt

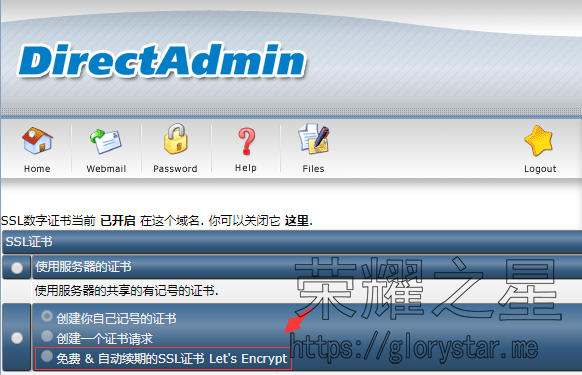
以上配置好后可以在用户面板看到Let’s encrypt SSL的选项

da4.png

以上参考官方链接:https://help.directadmin.com/item.php?id=648

但到这里还不是万事OK,我测试的时候发现并不到正常获取证书,提示以下错误

/usr/local/directadmin/scripts/letsencrypt.sh: line 81: dig: command not found

用以下命令解决问题

apt-get install dnsutils

之后还是有问题,提示如下

Nonce is empty. Exiting.

官方解决办法在这 链接:https://help.directadmin.com/item.php?id=664

cd /usr/local/directadmin/custombuild
./build update
./build curl

因为我的系统是Debian7 (centos可不用做此步骤) 还需要修改/etc/ld.so.conf

vi /etc/ld.so.conf
# 把/usr/local/lib/位置调到include /etc/ld.so.conf.d/*.conf上面,最终看起来如下
/usr/local/lib
/usr/local/mysql/lib
include /etc/ld.so.conf.d/*.conf
# 改好之后用如下命令保存
ldconfig

再获取证书就正常了。

再配置后台SSL登陆,提升安全系数

参考链接: https://help.directadmin.com/item.php?id=629

首先获取证书

cd /usr/local/directadmin/scripts
./letsencrypt.sh request your.hostname.com 4096

修改DA的配置项开启SSL后台登陆

cd /usr/local/directadmin/conf
perl -pi -e 's/SSL=0/SSL=1/' directadmin.conf
echo "carootcert=/usr/local/directadmin/conf/carootcert.pem" >> directadmin.conf
echo "force_hostname=your.hostname.com" >> directadmin.conf
echo "ssl_redirect_host=your.hostname.com" >> directadmin.conf

重启DA以使用配置生效

service directadmin restart

总算完成了,累死我了。。。匿了

在阿里云上折腾安装Directadmin管理面板 真的很折腾

购买了阿里云国际版的VPS,位置为新加坡,价格比搬瓦工之类的便宜VPS贵多了,因此想跟人合租分摊下费用。服务器已经搭建好,要合租的朋友请联系我,100块/年,2G硬盘20G流量,支持绑定10个域名。为确保服务稳定,只租十份

演示站点: https://test.glorystar.me

我之前在VPS上搭建web服务器环境都是用的军哥的LNMP,个人使用完全没问题。但如果是和人合租,用这个就不合适了。

目前虚拟主机界用得最多的控制面板应该就是Cpanel了吧(指国外),其功能和易用性确实好,但其商业授权太贵了,表示完全消费不起。想起N年前折腾免费空间用过的Directadmin面板,其功能也齐全,Cpanel有的功能基本都有,易用性上可能差一点,但胜在其便宜啊,不用每月付几十美元,而且还可以买终身授权。

最终在DA的一家小分销商那花300块入了个终身授权。

授权买下来了,就要开始配置了,之前没有弄过这个东东,大姑娘上轿头一回。遇到挺多坑的,还好一一趟平了,这里分享下经验。

注意:我配置Directadmin的VPS系统为Debian7.11 x32,其它系统参照本教程可能得做一些相应的改变。

首先,把你的Directadmin授权IP设置为VPS的公网IP,系统设置为Debian 7 32bit。

操作之前先更新系统再安装一些需要的包

apt-get update && apt-get install curl -y

Directadmin安装时是要验证服务器IP的,而阿里云现在开出来的机器默认都是专用网络(网卡绑定的是内网IP),这就是一大坑。最终通过虚拟一个网卡绑定其分配的公网IP解决。过程如下

假设你的VPS公网IP为 47.23.23.23 内网IP为 172.17.2.2 建立虚拟网卡的命令如下

ifconfig eth0:0 47.23.23.23 netmask 255.255.255.0 up

建好后这个网卡网络是不通的,要设置下路由表nat转发

iptables -t nat -A POSTROUTING -s 47.23.23.23 -j SNAT --to-source=172.17.2.2

把这两个加入开机启动,要不重启后又没了

sed -i '/exit .*/d' /etc/rc.local
sed -i '$a\ifconfig eth0:0 47.23.23.23 netmask 255.255.255.0 up' /etc/rc.local
sed -i '$a\iptables -t nat -A POSTROUTING -s 47.23.23.23 -j SNAT --to-source=172.17.2.2' /etc/rc.local
sed -i '$a\exit 0' /etc/rc.local

然后重启,重启过后用如下命令测试下虚拟网卡和路由转发正不正常。正常的话应该会把Directadmin首页抓取下来。

curl --interface eth0:0 -v https://www.directadmin.com

如果不正常的话,输入 ifconfig -a 看下eth0:0有没有正常上线,iptables-save看下有没有转发规则。

以上都正常的话,开始安装Directadmin

wget https://www.directadmin.com/setup.sh
chmod +x setup.sh
./setup.sh

Would you like to install these required pre-install packages? (y/n):

是否安装预安装包,按y确认。

Please enter your Client ID :

输入Client ID

Please enter your License ID :

输入License ID

Please enter your hostname (server.domain.com)

输入域名(不要用根域名)

Client ID: ID
License ID: ID
Hostname: da.yourdomian.com
Is this correct? (y,n) : y

确认以上输入是否正常,按y确认。

The following ethernet devices/IPs were found. Please enter the name
of the device you wish to use:

eth0 172.17.2.2
eth0:0 47.23.23.23

Enter the device name: eth0:0

输入虚拟网卡的名称eth0:0

Your external IP: 47.23.23.23
The external IP should typically match your license IP.
Is 47.23.23.23 the IP in your license? (y,n) : y

按y确认IP

DirectAdmin will now be installed on: debian 7.11 Is this correct?
(must match license) (y,n) : y

按y确认系统

Select your desired apache/php setup. Option 1 is recommended. You can
make changes from the default settings in the next step.

1: custombuild 2.0: Apache 2.4, mod_ruid2, php 5.6. Can be set to use mod_php, php-FPM or fastcgi.
2: custombuild 2.0: Apache 2.4, mod_ruid2, php 5.5 (php 5.5 is end-of-life)
4: custombuild 2.0: Apache 2.4, php-fpm, php 5.6.

Post any issues with custombuild to the forum: http://forum.directadmin.com/forumdisplay.php?f=61

Note: due to the current OS, some options are hidden because you must
use CustomBuild 2.0 Enter your choice (1, 2, 3 or 4): 1

选择apache/php版本,选1即可。

Would you like the default settings of apache 2.4 with mod_ruid2 and php 5.6 cli? (y/n): y
Would you like to search for the fastest download mirror? (y/n): y

以上全部y即可。

之后就静待它安装即可。

安装好之后发现exim服务stopped,手动启动也报错,在这里找到更新办法,命令如下

cd /usr/local/directadmin/custombuild
./build update
./build set exim yes
./build set eximconf yes
./build set eximconf_release 4.5
./build set spamassassin yes
./build update
./build exim
./build exim_conf

Directadmin默认是没有中文支持的,官方也没有中文语言包供安装,一番查找,发现Github上有一个中文语言包,开源的用起来比较放心。链接在此,简单说下安装过程

apt-get update && apt-get install git -y
rm -rf /usr/local/directadmin/data/skins/enhanced/lang/cn #之前有安装中文语言包要删除它
cd /usr/local/directadmin/data/skins/enhanced/lang/
git clone https://github.com/ninetian/diretcadmin-chinese-lang cn
chown diradmin:diradmin -R cn
perl -pi -e 's/language=en/language=cn/' /usr/local/directadmin/data/users/*/user.conf

刷新一下后台就会发现变成中文了,新建用户要注意在下方选择CN言语。

另外还有一个坑,配置新域名时你会发现域名解析已经生效,但服务器好像没有正确接管,访问域名还是服务器的默认页面,而不是新建主页自动配置的一个页面,这是因为入站流量还是走的绑定内网IP的那个网卡eth0,而DA接管的是我们新建的虚拟网卡eth0:0,会导致DA认为此域名没有正常托管。解决的话也简单,把内网IP绑定到外网IP就可以了

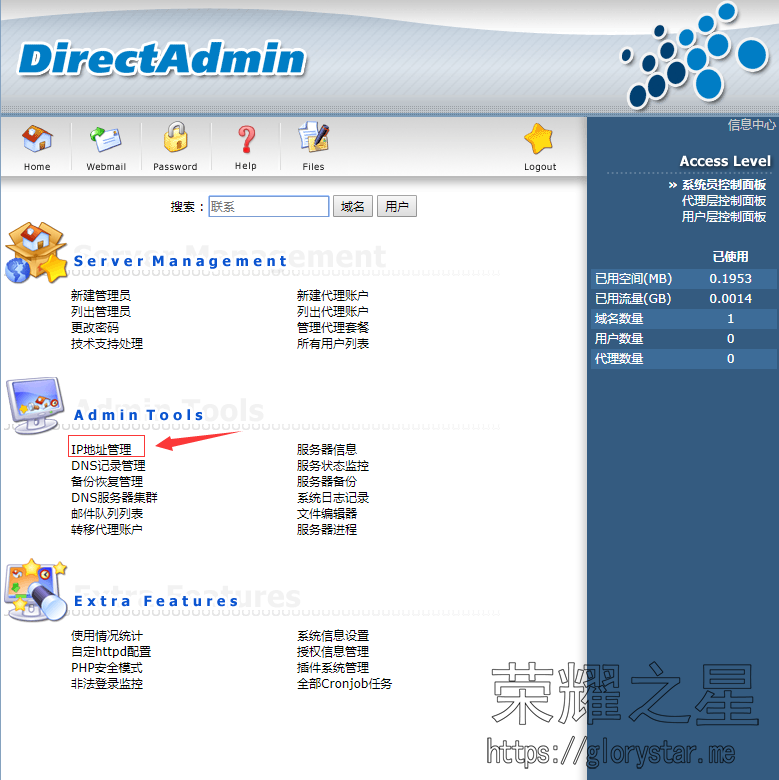
在管理员管制面板找到IP地址管理
da1.png
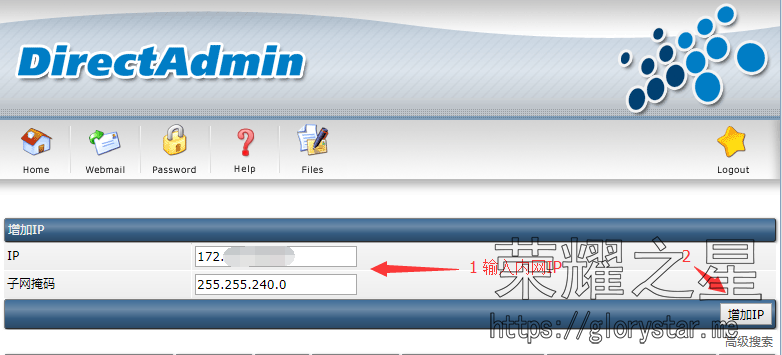
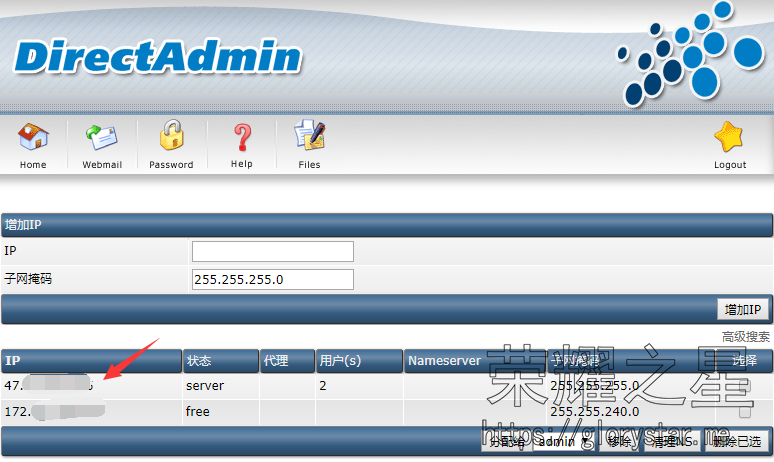
把内网IP加上去
da-ip.png
点击公网IP
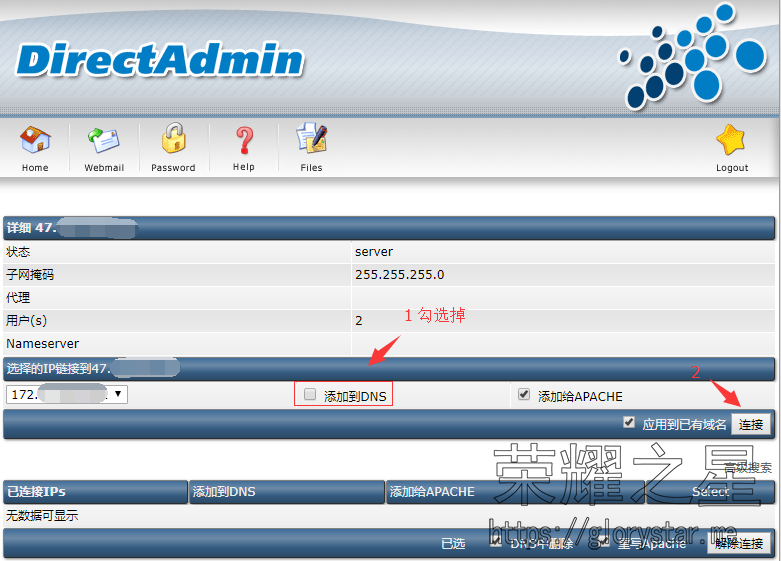
da2.png
选择的IP链接到{公网IP} 选中内网IP,勾选掉添加到DNS然后点连接
da3.png
再修改DA的配置文件

echo "lan_ip=172.17.2.2" >> /usr/local/directadmin/conf/directadmin.conf

重启下DA

service directadmin restart

至此完成。

还没填好的坑:阿里云封了25端口,导致新建用户无法自动发送账户信息邮件到用户邮箱,目前还没找到解决办法,待更新。